
Way back in August, I held a little contest. Andrea would have won anyway, being the only person that guessed, but she was also right! The movies were Abbot and Costello Meet Frankenstein (although they really just meet the Monster) and Them. Andrea's prize will be on its way to her shortly. Congrats!
Party theme idea
In an attempt to post something on Halloween during the actual season (close enough), I've had this open in a browser tab for a week, hoping to get a chance to post it: Superstition Party
Magazines
Finally got a copy of Martha Stewart Living, October issue tonight. Have not had a chance to go through it yet, but I buy a copy every year, sight unseen. I also picked up the magazine special, Halloween Handbook, The Best of Martha Stewart Living. This one I did flip through. Since I have every issue of the October mag for the last 13 years or so, plus a couple extra random ones, the original book and the other specials, I didn't find much new (but I haven't looked in detail yet). If you don't have the back issue collection like I do, this might be of some interst to you.
Wednesday, September 29, 2010
Friday, August 20, 2010
Decorate: Window Treatments


I was pretty bummed to realize that I did not have one window in the house that this would work for, but I had wanted to obscure the door to the utility room (the door is off the hinges because of the cats -- this is where one of the litter boxes is), so when John suggested tacking it up, I immediately agreed. (This won't stay up year 'round.)
Top pic: in the window sill, an assortment of skulls guard the party favors (in the cauldron), gifts for other August-born guests that don't live close, and a card from an off-season Halloween card swap.
Wednesday, August 18, 2010
The Cake Was Not a Lie

I searched online for cakes that appealed to me and provided pictures to SIL-C and set her loose. I wanted the topsy-turvy style, even though they're very trendy right now (I generally eschew trendy stuff), a general color scheme and Halloweeny accents. We settled on mainly chocolate cake, with the middle section being cherry chip (a family favorite). She seriously came through, with a beautiful piece of edible art that was yummy, too.
 Another angle, so you can see the giant spider on top of the cake. There were candy eyes and pumpkins around the trees (also edible) . Plastic spiders, bats, ghosts, cats and pumpkins completed the look. Oh, and the little skulls? They're beads.
I just love the details: the coordinating cake-board (sitting on one of my cake stands), with the spiderweb "doily."

Mid-party status. That's a lot of layers!!
Monday, August 16, 2010
Entertaining: Movies & Games
Remaining on the subject of my recent Halloween-themed birthday party:
There's no sense in getting too attached to your agenda. Things happen and the evening might not go as planned. Guests show up late, have car trouble, and might need a ride to an auto parts store. People might just end up really getting into the conversation and you don't necessarily want to interrupt it to start a movie.
We had planned on a "double feature" as the central part of the evening, but it didn't go off quite as planned. We had video games set up in another room, and the targeted audience of the first movie were not in the "theater room" (or left early). We got started much later than usual, but again, not necessarily a bad thing: people really seemed to enjoy the food and there was a lot of animated conversation going on, so we just went with the flow.
 The big surprise for the evening (for some of the guests anyway) was my birthday gift from John. He got me a very late-model HD projector and build a HUGE screen for it (102"). We've been using it for the better part of a month to watch DVDs (Dr. Who on a screen that big? Fantastic.) If you've been reading the blog, you might remember that we even made up tickets to go with the invitations.
When there was a lull in the conversation and a lot of the food was gone, we announced the start of the movie. After two families left and another arrived, we stopped the first movie and had a brief intermission, then started the feature film of the night.
In Sunday's post, I mentioned a contest. Here it is: Images from the two movies we showed at the party are below. If anyone can name them both, they're guaranteed a prize: some of the drink charms and a copy of the music mix party favor. Put your guess in the comments -- make sure there's a way for me to reach you (blog link, email address, something.) If you only know one, guess anyway. If no one gets them both right, I'll go to a single correct guess. (Guests who were at the party are exempt. Besides, they already have the CD and I'll give them drink charms if they want.)
 Movie #1
Hint: This might not be what you think it is. This was a movie for the kids, so it would be classified as a comedy. (That's a really big hint.)
 Movie #2
Hint: There might be a bit of a hint on the ticket.
If you know, or think you know, what either movie is, please comment! I'll give it to the weekend. If there ends up being only one correct guess, for either film, that person will win the CD and drink charms. If there is actually more than one correct guess, then I'll do a drawing on Saturday or Sunday.
Games
After almost everyone had gone home, a couple of the guests (Melanie & her 8-year-old daughter) hunkered down on the floor and played a round of Zombie Dice. It went really fast because the 8-y.o. got 12 brains on her first turn (you need 13 to win the game). I joined them for a round of Cthulhu dice (same link), and then Melanie's husband joined us for a second round. That game also went fairly quickly, as it was designed to, but I was right: it's way better with more people.
We decided that we would have to have a Cthulhu/zombie game night in a few weeks. (Melanie & Richard got me the Zombies!!! game, not realizing that I already had it. Now they own a copy, too!)
There's no sense in getting too attached to your agenda. Things happen and the evening might not go as planned. Guests show up late, have car trouble, and might need a ride to an auto parts store. People might just end up really getting into the conversation and you don't necessarily want to interrupt it to start a movie.
We had planned on a "double feature" as the central part of the evening, but it didn't go off quite as planned. We had video games set up in another room, and the targeted audience of the first movie were not in the "theater room" (or left early). We got started much later than usual, but again, not necessarily a bad thing: people really seemed to enjoy the food and there was a lot of animated conversation going on, so we just went with the flow.
 The big surprise for the evening (for some of the guests anyway) was my birthday gift from John. He got me a very late-model HD projector and build a HUGE screen for it (102"). We've been using it for the better part of a month to watch DVDs (Dr. Who on a screen that big? Fantastic.) If you've been reading the blog, you might remember that we even made up tickets to go with the invitations.
When there was a lull in the conversation and a lot of the food was gone, we announced the start of the movie. After two families left and another arrived, we stopped the first movie and had a brief intermission, then started the feature film of the night.
In Sunday's post, I mentioned a contest. Here it is: Images from the two movies we showed at the party are below. If anyone can name them both, they're guaranteed a prize: some of the drink charms and a copy of the music mix party favor. Put your guess in the comments -- make sure there's a way for me to reach you (blog link, email address, something.) If you only know one, guess anyway. If no one gets them both right, I'll go to a single correct guess. (Guests who were at the party are exempt. Besides, they already have the CD and I'll give them drink charms if they want.)

Hint: This might not be what you think it is. This was a movie for the kids, so it would be classified as a comedy. (That's a really big hint.)

Hint: There might be a bit of a hint on the ticket.
If you know, or think you know, what either movie is, please comment! I'll give it to the weekend. If there ends up being only one correct guess, for either film, that person will win the CD and drink charms. If there is actually more than one correct guess, then I'll do a drawing on Saturday or Sunday.
Games
After almost everyone had gone home, a couple of the guests (Melanie & her 8-year-old daughter) hunkered down on the floor and played a round of Zombie Dice. It went really fast because the 8-y.o. got 12 brains on her first turn (you need 13 to win the game). I joined them for a round of Cthulhu dice (same link), and then Melanie's husband joined us for a second round. That game also went fairly quickly, as it was designed to, but I was right: it's way better with more people.
We decided that we would have to have a Cthulhu/zombie game night in a few weeks. (Melanie & Richard got me the Zombies!!! game, not realizing that I already had it. Now they own a copy, too!)
Sunday, August 15, 2010
Make: Drink Charms
Well, the last couple of weeks have just been nuts! We had some pick-up scenes to shoot for the movie, then my actual birthday, which John & I spent quietly together. Then a madcap week of prepping for my first birthday party in absolutely ages. In the middle there, somewhere, I redid the Chartarum website (you should check it out; I'm very proud).
Finally, last night, it all came together. Of course, I didn't get everything finished, but those are now ideas to be used for future parties - no reason to be upset. The guests who came either loved the idea of a Halloween part in August, or understood my excitement and played along. There were even some Halloween-themed gifts!
I'm back to blogging, but with keeping two other sites going, I may not be able to post quite as often as I did previously. But I will still try to get a couple of posts in a week. There will be a flurry of party-related posts, and then I'll back of to a minimum of two posts a week. Now that Halloween stuff is starting to hit the stores - online and brick & mortar - I'm sure I'll have plenty to share once I run out of Show & Tells from around the house.
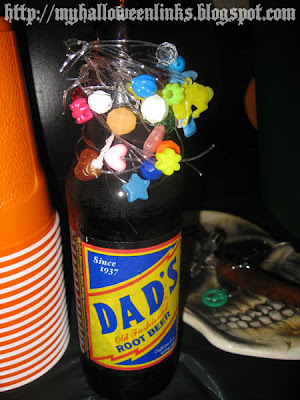
 Now, on to today's topic; Drink Charms. I don't think I've ever been to a party - even a small family gathering - where a beverage glass or bottle was held aloft and the word's "is this mine?" were uttered. John & I did a bit of driving and spent a little more than usual laying in a nice variety of cane sugar sodas (no HFCs). I didn't want any of it to go to waste; so, at almost literally the last minute (about
  an hour before guests started to arrive), I gathered up some materials and made a big pile of these drink charms.
 While I was at a store earlier in the day, I thought I'd look around for some wine glass charms or something. No luck. Then I spotted some pony-tail holders in the dollar bin. They wouldn't quite work, because there were two smallish loops, each with a giant bead. But it gave me an idea, which didn't click in place until the eleventh hour.
I have a TON of beads and buttons. I make stitch markers for knitting and have done other beading besides. I also recently purchased some elastic beading cord and DING! A light bulb went on. Sadly, the majority of my beads were far too small for this concept to work, and I didn't have a large enough variety.
Then I remembered this large bag of plastic beads and charms I had tossed into a bin of things I set aside for swaps or small surprises for children I know. Aha!!! That was it.
I cut lengths of .8 - 1mm elastic beading cord (available at any craft store, I would think) and started stringing a bead or charm on each and knotting them securely.
 The key is variety. I wanted each one to be easy to remember, but didn't figure people would remember nuances of shades, so I only used one of the 6 different shades of purple.
An assortment of plastic charms is even better. It's much easier to remember "sea horse" or "the bat-phone" than faceted-orange-bead. I had a few left from a purchase I made years ago (while I may lose craft supplies, I never throw them away), but mostly had to go with brightly colored round and shaped beads. I recommend a quick stop on Etsy and search (under supplies) for plastic charms or gumball charms (may be your best option).
 The drinks table (right). In the cauldron were vintage flavored sodas (Frosties, Bubble Up, Dad's Rootbeer, etc.), available at World Market (their logo was on the box)
The green tub was filled with several varieties of Jones Soda. We had a hard time finding it locally so ended up buying a couple of mixed cases at World Market as well. The flavors were limited, but people did NOT seem to mind. The little black tub in the back held bottles of water.
You can see the dish of drink charms on the table with the totally unnecessary bottle opener (all the bottles had screw-off lids, although the vintage ones did not look it). I wasn't quite as prepared as I thought; I forgot all about diet pop! Some kind friends stopped an picked up some on the way. Which reminds me: Mel, if you're reading this, please tell me how much I owe you for the ice & the other pop! The only person that lost track of their drink was me, but it was just a bottle of water and I sorted it out eventually.
If you made it this far, congratulations! The next post is going to contain a bit of a contest, and a handful of the leftover charms (I made too many) will be part of the prize.
Finally, last night, it all came together. Of course, I didn't get everything finished, but those are now ideas to be used for future parties - no reason to be upset. The guests who came either loved the idea of a Halloween part in August, or understood my excitement and played along. There were even some Halloween-themed gifts!
I'm back to blogging, but with keeping two other sites going, I may not be able to post quite as often as I did previously. But I will still try to get a couple of posts in a week. There will be a flurry of party-related posts, and then I'll back of to a minimum of two posts a week. Now that Halloween stuff is starting to hit the stores - online and brick & mortar - I'm sure I'll have plenty to share once I run out of Show & Tells from around the house.
 Now, on to today's topic; Drink Charms. I don't think I've ever been to a party - even a small family gathering - where a beverage glass or bottle was held aloft and the word's "is this mine?" were uttered. John & I did a bit of driving and spent a little more than usual laying in a nice variety of cane sugar sodas (no HFCs). I didn't want any of it to go to waste; so, at almost literally the last minute (about
  an hour before guests started to arrive), I gathered up some materials and made a big pile of these drink charms.
I have a TON of beads and buttons. I make stitch markers for knitting and have done other beading besides. I also recently purchased some elastic beading cord and DING! A light bulb went on. Sadly, the majority of my beads were far too small for this concept to work, and I didn't have a large enough variety.
Then I remembered this large bag of plastic beads and charms I had tossed into a bin of things I set aside for swaps or small surprises for children I know. Aha!!! That was it.
I cut lengths of .8 - 1mm elastic beading cord (available at any craft store, I would think) and started stringing a bead or charm on each and knotting them securely.

An assortment of plastic charms is even better. It's much easier to remember "sea horse" or "the bat-phone" than faceted-orange-bead. I had a few left from a purchase I made years ago (while I may lose craft supplies, I never throw them away), but mostly had to go with brightly colored round and shaped beads. I recommend a quick stop on Etsy and search (under supplies) for plastic charms or gumball charms (may be your best option).
 The drinks table (right). In the cauldron were vintage flavored sodas (Frosties, Bubble Up, Dad's Rootbeer, etc.), available at World Market (their logo was on the box)
The green tub was filled with several varieties of Jones Soda. We had a hard time finding it locally so ended up buying a couple of mixed cases at World Market as well. The flavors were limited, but people did NOT seem to mind. The little black tub in the back held bottles of water.
You can see the dish of drink charms on the table with the totally unnecessary bottle opener (all the bottles had screw-off lids, although the vintage ones did not look it). I wasn't quite as prepared as I thought; I forgot all about diet pop! Some kind friends stopped an picked up some on the way. Which reminds me: Mel, if you're reading this, please tell me how much I owe you for the ice & the other pop! The only person that lost track of their drink was me, but it was just a bottle of water and I sorted it out eventually.
If you made it this far, congratulations! The next post is going to contain a bit of a contest, and a handful of the leftover charms (I made too many) will be part of the prize.
Sunday, August 8, 2010
Happy Birthday to Me!
Hi, everyone! It's my birthday and I wanted to pop in and, um, wish myself a Happy Birthday. Also, to say that I'm going to take a brief break from posting. The next week is going to be very busy!! I'm having a small party on Saturday and there is much to do.
In the meantime, I invite you to check out the Chartarum Facebook page. (Chartarum is the name of the movie project I'm involved in.)
In the meantime, I invite you to check out the Chartarum Facebook page. (Chartarum is the name of the movie project I'm involved in.)
Friday, August 6, 2010
Make: Insanely Easy Cloak
Another tutorial re-boot from www.myhalloweenlinks.com.
This easy cloak has only 3 seams (unless you're doubling the width). It's a great last-minute project if you need something with a high neck. Depending on the material, it could also be a warm layer for trick-or-treaters in cool climates.
Materials
This easy cloak has only 3 seams (unless you're doubling the width). It's a great last-minute project if you need something with a high neck. Depending on the material, it could also be a warm layer for trick-or-treaters in cool climates.
Materials
- A couple yards of fabric. (I like to use "double backed flannel" - really thick flannel - or lightweight wool. If the fabric is too thin, it won't flow right.) See Fabric, below.
- Yard or so of decorative cord or drapery cord. (Ribbon is too light!)
- Scissors
- Sewing machine
- Needle & thread (to make channel narrow, and if you want to do it by hand).
- You're going to turn the fabric so the that the selvage (machine-finished edges) are the sides. This way, you won't have to sew the sides, too.
- Once you figure out how long you want the cloak to be, add several inches for the collar and hem. (See the directions to figure out how much).
- For a floor-length cape, measure from your neck to the floor, going over the shoulders, and add 2-3 inches for hem and flow (more if you have big hips, etc.). Then decide how high you want your collar to be and double that amount. For a 3" high collar, add 6". I'm about 5' 3" with generous hips and a yard and a half is plenty long enough.
- If you want it wider, you can get 2 pieces and sew them down the center. The regular width works well for kids and average-size adults. If you're bigger or just want it voluminous, buy twice this amount. Cut it in half, sew the 2 pieces together down the center (two selvages together) and then treat it as one piece.
- All measurements for this are guesstimates - just add a few inches to be on the safe side, and hem the bottom last.
 Fold the desired height of the collar down and either pin or iron into place (my preference).
 About 1/2" from the bottom of the fold, sew 2 seams, about 1" apart.
- Run cord through the channel you created and gather until the top fits comfortably around your neck.
- Tie knot in cord at one end near the gather, and then, using needle & thread, sew just a few stitches at the edge to make channel too narrow for knot to pass through. Repeat for other end.
- Try on cape and note where the hem should be. (A second pair of hands will come in handy if you're making this for yourself.)
- Hem to desired length. I leave this for the very last in case I miscalculated the length in either direction (if I made it too short, I make the hem as small as possible; if too long, hem to desired length and cut off excess).
For kids, make sure it doesn't drag the floor or they can trip while trick-or-treating. An inch or two above the floor is good for kid-length. Also, use caution with cords for young children, as they can be a choking hazard.
Wednesday, August 4, 2010
No Trick-or-Treaters?
 Me either! I really do love living out in the country. I don't miss my incredibly nosy neighbors from the city at all and hope that the people that moved in after us have a least one car up on blocks and maybe hold some kind of summer camp in the backyard or some naked solstice dancing. Wait, where was I? Oh, yeah. But the one thing my old neighborhood had going for it was the trick-or-treaters (TOTers), something we did not see any sign of on our first Halloween in the new place.
The place I grew up in did Halloween very differently from where my husband grew up. Apparently, in some towns TOTing goes on for hours. In my hometown, and in the town we lived in when we were first married, TOT was for one hour, period. The fire station whistle would blow, I think at 7 PM, and then again at 8. Where my husband grew up (really just several cities over), TOT started sometime in the early afternoon and went until dark or until you ran out of candy.
 The house I grew up in was on the other side of a busy street from most of my friends and was the side without a sidewalk. When I was a kid, my peers would be escorted across to the few houses there to get candy, but after we grew out of TOTing, our friends did too, and we were lucky to get ten kids. In later years, after I rented the house from my parents, I might get one or two.
My last Halloween there, I resolved to just give out money (50¢?). If we got our usual amount, I'd still come out ahead. If we got fewer kids, I wouldn't have a bag of candy taunting me. That year, I got the most TOTers: a whopping four, but only because three showed up after the whistle (they'd heard about the money) and I was in a good mood.
Then I moved to a slightly larger, more suburban area, with actual sidewalks. We had the same one-hour period, whistle-to-whistle, but oh, what a difference those sidewalks made! I never counted, and I'm sure I never hit any major record, but it was common for me to get 30 or 40 TOTers in that hour. Most were polite. Many were adorable. Every year, there would be a couple that made me consider just keeping the light off (surly teens without costumes, adults demanding candy for babies "asleep in the car"), but by the time October rolled around, I couldn't wait to pass out candy again. (I'll confess to having two bowls of candy: one with the good stuff for the ones that were into it, with attempts at costumes, and a small bowl with less-good candy for those who shoved other kids to get to the door, didn't wear costumes, didn't say a word...)
 Now, we live in the country with, you guessed it, no sidewalks. And zero trick-or-treaters. So, what does one do when there are no TOTers? Carve a pumpkin anyway and watch scary movies! (Our jack-o-lantern last year (right) was based on those in the Orc areas in World of Warcraft (my idea, my husband's work).) Somewhere near the big day, have a small party to watch old, bad sci-fi or horror movies.
Something I used to do was put together goody bags for kids in my life (niece & nephew, friends' kids). Some people do the "boo" thing, where they leave surprise packages for friends and neighbors.
I'm content to stay home, but if you're really jonesing for a fix, you can see if any friends would let you take over candy duty while they take their kids TOTing, or just let you hang out during the evening and help.
Tuesday, August 3, 2010
Show and Tell: Spooky Tree


Sunday, August 1, 2010
Make: Mini Vintage Postcard Magnets
Another tutorial re-boot from www.myhalloweenlinks.com.
 Use reduced versions of postcards from the Golden Age of Halloween to make magnets for yourself or to share with friends. These magnets would make great party favors and they're a snap to make!
Materials

Materials
- Color prints of vintage Halloween postcards. Either select a variety or one great image. Depending on the magnet style you go with, the images (or magnets) may have to be cropped to fit.
- Sources - find online (highest resolution possible), right-click and save to your hard-drive (e.g. Antique Halloween e-Cards). You can also buy books of reproduction postcards (e.g. Old-Fashioned Halloween Cards: 24 Cards
) -- since this is for personal use, you should be able to copy a couple and reduce the image size.
- Resize in whatever way works best for you, depending on which magnet style you decide to go with. If you don't have access to any photo-editing software, I can recommend www.picnick.com. It's free and you don't even have to register. (I did register for the most basic access and have never received any spam.)
- Magnets
- Business-card-sized magnets are, to the best of my knowledge, the thickest and would actually hold a piece of paper on your fridge. Buy a package at the office supply store or collect actual business magnets and cover up image w/ your own! If you go this route, the existing vintage images will have to be trimmed a bit because the proportion is slightly off (or you could trim a bit off the magnet to keep the image as-is).
- Skip the glue and buy printable sheets of perforated cards (Avery Ink Jet Magnetic Business Cards
) or magnet sheets (Avery® Magnet Sheets
). If you go with the full-size magnetic sheets, you can keep the cards' original proportions; however, they are very thin and would only serve as a decoration. (I haven't used the perforated magnetic cards so I don't know how thick they are.)
- Glue stick or rubber cement
- Scissors or Paper cutter
- Cut out images
- Glue to magnets
- Package (think cellophane sucker wrappers from the cake decorating section)
- Give (make sure you keep one for yourself!)
Friday, July 30, 2010
Make: Gravestone Rubbing

This was something my grandmother did when I was a kid. It's been close to 30 years since I've tried it. A few years ago, I ordered a stone-rubbing kit, but didn't do anything with it except lose one of the pieces. I also ordered the video linked below. On an overcast Sunday, in late April '06, I took the "boughten" kit and the other items I'd assembled, and headed to a local cemetery.
It was a real learning experience. First off, it's quite physical work. And time-consuming, if you do it right. Two major things to take with you, in addition to the materials needed for rubbing: sunscreen and drinking water. I remembered the first, and attempted to get the second, but the store had NONE in stock. Not even in the machines outside (truly bizarre). I figured I wouldn't be that long so it wouldn't matter, but I was mistaken! Even on a cool, overcast day, I got a little dehydrated.

Resources
- Association for Gravestone Studies
- Morbid Outlook: How to do gravestone rubbings
- Cryptic Clues in the Bone Yard. I have this video in my collection, and found it to be quite interesting. It shows you how to build a complete kit without spending a ton of money. The benefit to the video over a website is that you can watch someone do a rubbing.
- Cyndi's List - a list of cemeteries & funeral homes. Intended for genealogists who want to find a particular grave; however, there may be resources that will help you find a good cemetery to visit.
- There are stone-rubbing kits available. The one I purchased had 5 sheets of special paper, 2 cakes of very hard rubbing wax, a roll of low-tack masking tape and a soft bristle brush.
First, pack your bag. A great comprehensive list is available in the resources. My first trip included the items pictured below. Make sure to wear clothes you don't mind getting dirty, and take a big bottle of water!


Originally, this cemetery was very, very Baptist. Even if the sign didn't explain it, you could tell by the fact that on the vast majority of the older stones, the women didn't have last names. They were "Jane, wife of John Smith," never "Jane Smith." That's why I picked these two to work on for my first try. It helped that Reed (Abigail's stone, shown up top) is a family name, and she died near Halloween. But essentially, I selected two stones that were in good shape that denied the women their own last names.

Keep rubbing, until the image is clear and as dark as you'd like it. Carefully remove the tape and roll up the rubbing. See resources for care & handling of the rubbing after you get it home.

These aren't perfect - not by a long shot - but I'm happy with my first attempts. Sadly, they didn't make it to the new house for some reason, so another trip is in order.
Wednesday, July 28, 2010
Show and Tell: Candle Holder

The glass insert has seen better days, and I'm on the lookout for a replacement.
Monday, July 26, 2010
Make: Bubble Favors
Another tutorial re-boot from www.myhalloweenlinks.com.
 I used these (with different labels) for prizes when I led training classes at the corporate level. I called them "stress bubbles," but you can call them whatever you want. You can give them to trick-or-treaters, or use them as party favors - alone or in a bag of goodies.
Gather Materials
Assemble
Label sample (not to scale) - Click to open PDF (right-click to save to your computer):
 Note: I made this so long ago, I have no idea what my sources are. Sorry!

Gather Materials
- "Wedding Favor" bubbles. Avoid the fancy packaged ones at craft stores and look for packs at $1 stores or big box stores (I just bought a 9-pack for $1). You shouldn't have to pay more than 25¢ each.
- Tape. Try to match the height of the label, plus a little bit if possible (alternately, make the label a little shorter than the tape). If you use a laser printer, the width of the tape isn't as crucial, but if you use an inkjet printer, you'll want to cover all of the print; otherwise, the ink will run when the bubble liquid spills (inevitable). If you can get 1" wide clear tape, this is perfect. In a pinch, you can layer regular transparent tape, but you may need to trim a bit.
- Labels. Print several images on plain paper and cut out. You can download mine (click image below to open PDF) or make them yourself. You can fit several onto 1 sheet. The labels should be just under 1" high and about 3.5" long. You can do black text & graphics on colored paper, or full color graphics on white paper, etc. Other ideas: Put each persons' name on a bottle. Use a plain mailing label, and handwrite the message or add a sticker scene.
- Stickers &/or ribbon. If desired.
Assemble
- Design your labels, following the specifications above & print onto plain paper. Print & cut out. Add stickers, if desired.
- Wrap the labels around the center of the bottle and tape or glue in place. If it's possible that the ink will run, apply tape across the whole label.
- Add ribbon around the neck, if desired.
- Share!
Label sample (not to scale) - Click to open PDF (right-click to save to your computer):
Saturday, July 24, 2010
Party Planning: Invitations
 Following up a "save the date" mailing, which serves as bit of a teaser and lets people know there is more to come, the invitation gives the needed details (what, when, where, etc.). More information is always available via phone or email.
The first thing you might notice is that the colors are not what you'd expect for a party of this nature. Well, it is an off-season party! I like the incongruity of the summery colors with the skull and spooky font. One thing I'm trying to do is to use some of the things I've been collecting for all these years. I bought these fun invitations not too long ago because the main card color is pretty close to my signature color. This style of invitation is great because you can run the top card through your printer, then attach it to the base card with foam mounting tape.
I had initially planned on stamping the invitation like the envelopes, using the smaller stamp. But I realized a couple of things: 1) the skull was facing the wrong way (for my preference), and 2) I hate trying to line up the stamped image (or, if stamping first, trying to make the text line up properly). My solution: stamp the skull on white paper and scan it, then clean up the image, color it any way I wanted, and lay out the invitation and print (I used Adobe InDesign). This way I could flip the skull so it was facing the way I wanted it for the top of the page.
I've been learning to pare down what is included on the invitation. (I'm not all the way there yet, but it's better than our first party invitation!) This is not a costume party, so I wanted people to be aware (people can feel awkward if they show up to a non-costume party in costume). I also don't want there to be any questions about whether or not guests should feel free to bring hand-crafts like knitting or crochet (always fine at this house). Everyone already knows we have cats, so that info. isn't necessary any more. If we were doing a adults-only party, or were requiring costumes, that information would be important to include.
Stamps: Skull, from StampFrancisco: Large and Small
Ink: Vivid! Dye Inkpad, in Garnet
Font: Black Castle, from dafont.com
Text
Join us if you dare!
For a slightly spooky, not at all sinister, mid-summer “Hallowe’en” bash.
(It’s not really Hallowe’en, but that doesn’t mean much around this place.)
Why:
When:
Where:
Wear: Regular casual (although people have been known to show up in PJ pants & bunny slippers, and that is fine).
What-not: It’s not an over-the-hill party, just a regular birthday party where the theme happens to be Halloween (the birthday ghoul’s favorite holiday and year ‘round obsession).
Food, games, movies and conversation are planned. Knitting/crochet are always welcome. Feel free to get in touch with any questions!
RSVP
by
(email)
Inserts
By the time this post is visible, everyone on the guest should have received their invite, so it's safe to share the item to the right. We always show a movie or two during the course of an evening, and this time have a special surprise for our guests (more on that later). We thought it would be fun if people had a little souvenir (if they like that kind of thing), and worked up this little ticket. I don't know if you can tell, but they're actually perforated. I based the design on vintage movie tickets (like these) and used Photoshop, InDesign, card stock, a sewing machine, paper cutter and hole punch to achieve the look. (If there is interest, I could work up a tutorial.)Fonts: Jefferson (Liberty Hall), Harting (Admit One) & Kenyan Coffee (everything else)
Not shown: an insert with additional info. We have a large yard, so people can camp overnight if they'd rather not drive home and wanted everyone to know.
Friday, July 23, 2010
Show and Tell: Witch Hat

It makes me a little sad that I can't wear this more often. Truth is, it's a little snug on my big 'ole noggin. And there is really no call for a suede witch's hat most of the time. So this darling bonnet resides atop an old clock in our library (brought down for pictures).
Hat source: Broom Rider from Blonde Swan.
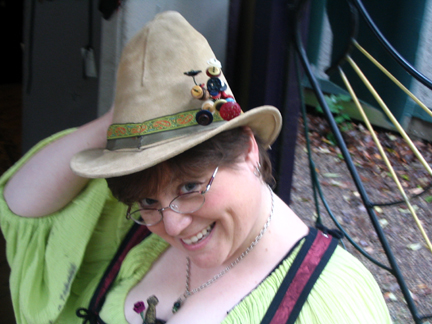 I've had this for a few years; here's a picture of me wearing it several summers ago. My best friend got the black one, and I didn't want to look too much like a copycat, so I went with this one. I added the ribbon band because the unrelenting beige wasn't really to my taste.
That little bouquet of vintage buttons (and spool) that I made is around somewhere...
Thursday, July 22, 2010
Theme: Zombies
 From time-to-time, I'm going to put together a collection of links on a topic and share them here. This time: zombies! There are different kinds of zombies. I will always mean the non-Voodoo version; think of Night of the Living Dead: slow-moving; dumb but deadly. Any George Romero zombie. I'm including a sprinkling of Return of the Living Dead, just because of the "Braaaaaains!" thing. By no means should this be considered an exhaustive list; I could go on & on...
Misc. Zombie Fun
- Haunted Paper Toys has two different zombie sets to print, cut out and stand up: Monsters #5 & Monsters #6. There is a zombie in the Pocket Monsters collection, which makes great bookmarks and, finally the zombie mask.
- The Zombie Hunters is a fantastic web comic (that I'm really behind on)
- End of Days kit (crafty): don't forget to include knitting (or materials for your favorite portable hobby)
- Flesh Eating Zombies Figure Set
just a sampling; it's not possible to list them all, and everyone has their favorites
- Shaun of the Dead
is a very dark comedy using entirely Romero-style zombies. I'm listing it first because it's fun. Gory, yes. But funny at the same time.
- Night of the Living Dead (NotLD) is the classic, black-and-white cult film that really kicked off the horror zombie genre. There were movies in this series: NotLD, Dawn of the Dead, Day of the Dead and Land of the Dead. Note: I cannot, even a little bit, recommend the remakes of Dawn or Day of the Dead. The latter was so bad that it didn't resemble the original at all. Both had the wrong kind of zombies. Stick with the classics!
- In 2007, Romero began a new series, which (so far) includes: Diary of the Dead and Survival of the Dead. He has plans for more, each picking up a character (or characters) where Diary left off.
- The Evil Dead • Evil Dead II (really, a remake of the first movie) • Army of Darkness
- Dead Alive (incredibly gross, but funny)
- Zombieland
- The Return of the Living Dead - campy as all get-out, this is the source of the "braaaaains" line that is inevitably uttered when discussing zombies. (Although everyone knows zombies will go for any flesh.) There are several movies in this series.
- Sort-of zombie movies that I like: 28 Days Later and Night of the Comet (apocalyptic-type movies, people acting kind of like zombies, but not rising from the dead)
- Resident Evil Trilogy 1-3 (bears virtually no resemblance the games)
- I asked my husband if he'd add anything to this list, and he suggested some of Lucio Fulci's movies: Zombie & Zombi 2.
- The Zombie Survival Guide: Complete Protection from the Living Dead. Essential.
- World War Z: An Oral History of the Zombie War. Surprisingly, this was a fascinating read. Very well-done; I found myself forgetting that it was fiction. If real history books were written like this, I think more people would remember what they studied!
- Pride and Prejudice and Zombies. Must be included. I'm on the fence about this one, but it's wildly popular.
- Apocalypse Chow: How to Eat Well When the Power Goes Out. Not really about zombies. But if you're preparing your zombie apocalypse preparedness plan, then a cookbook like this could really come in handy. (I am so bummed that it's out of print, but used copies are frequently available.)
- Zombies!!! Believe it or not, my husband and I bought this game, and played it, on our honeymoon. As a game, it's probably better with at least 3 people. There are a ton of expansion packs for the game, but start with just the main box to see if you like it. If the game doesn't' come with it, go ahead and order a bag of zombies. You can use them as cupcake toppers as well.
- Zombie Dice (just reviewed recently)
- Try these strawberry jam-filled candies (Skull Crushers), or use a brain mold instead.
- Straightforward & simple: cupcakes with zombies from the BagOZombies (wash first) on top.
Tuesday, July 20, 2010
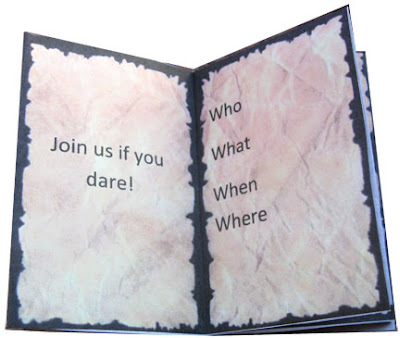
Make: Necronomicon Mini-book Invitation
I have a few small tutorials that have been housed on MyHalloweenLinks, but I'm going to transition them to here, because they need to be updated. The first is a "hack" of an existing mini-book created by Ray O'Bannen (linked below). These directions will show you how to add text to his image, so you can use this little booklet as an invitation and more.
 You have six small pages to enter your details. You will need some minor layout experience, MS Word experience (or any page layout program -- I initially wrote the directions for Word, so I'm continuing) and access to a color printer. The file used to be in Word, but is now in PDF format, which might make this a little more difficult.
Disclaimer: Ray O'Bannen designed the faboo mini-book; I'm just applying my idea to his existing art. Neither he nor his site have anything to do with this one.
Directions
- Download the PDF for Book 3 on the Haunted Paper Toys' Necronomicon Notebooks page (Books 1 & 2 are cool, but have illustrations - I haven't tried this method with them, but it could work!).
- Get the image into Word. There are several ways to do this, and I can't go into them all. I was able to select the image on the PDF and copy it, then paste it into a Word document.
- Add text boxes over the "parchment" pages, following the guide (right).
- Set the layout to "in front of text" if it didn't happen automatically (otherwise, you can't move the box around).
- After you create the text box, use the formatting options to adjust the text direction to match the first image, then go to Format/Text Box to turn off the border and fill.
- Print. (How it looks will depend on the font you use and the quality of your printer.)
- Follow the directions (first link on the Notebooks page) to assemble, then pop in an envelope and mail!

Monday, July 19, 2010
Games: Alan Wake
This is a quick drive-by posting. I don't think I qualify as a gamer, per se, because my interests and skills are very limited. I tried Ghostbusters 3 (PC) and couldn't do it. I managed Dragon Age: Origins (PC) and World of Warcraft okay, but couldn't hack the controls for the newest Resident Evil (console). (I have hand/eye coordination issues and first-person shooters trigger massive dizzy spells. (I'm still sad I couldn't play Portal.)) I got pretty good at Viva Piñata...I SO fail at being a gamer.)
 I don't think I can play Alan Wake, either (haven't tried the controls yet). But whoa, is it cool! It's actually a game I'll sit down and watch someone else play. It's reminiscent of Twin Peaks (which I loved), and I'd have a hard time believing it's not intentional. There's a bit of Steven King thrown in as well (he's actually quoted at the beginning).
We got through episode 1 yesterday (there are 7 currently, with more promised as future downloadable content) and I was kind of sad that I was so drowsy I couldn't keep watching. (I've watched bits and pieces of games while others played, but never more than a couple of minutes.)
Alan Wake is a best-selling writer who has hit a slump and travels with his wife, Alice, to Bright Falls, WA for a change of scenery. He's not there long before things turn truly bizarre and pretty freaking scary.
Sunday, July 18, 2010
Games: Zombie Dice & Cthulhu Dice

We didn't buy anything else that day, because the prices seemed a tad high, but after we got home, my husband looked up one of the games online and found that they were available for a much better price directly through the company (Zombie Dice, at the comic store: $24.99; direct from Steve Jackson games: $13.13, plus shipping). I'm all for buying locally, when it's sane. The local shop's price, however, was not sane.
What we got, for around $20: Zombie Dice and Cthulhu Dice, directly from Steve Jackson Games. Pictured above is the die from the Cthulhu set (more on that in a bit). Both games are fun, fairly quick to play, and very portable.

With just two people playing, this game went pretty quickly; like all games of this type, it's certainly more fun with three or more players.
In this game, you're the zombie. Each die represents a potential human victim, color-coded to indicate the strength of your opponent. (The green dice have more brains, the red have more shotgun blasts.) You roll three dice at a time, hoping for brains (obviously, since you're a zombie). Setting aside the brains and the shotgun blasts (feet = escape), you keep rolling three at a time until you have three shotgun blasts, then tally up how many brains you got. The first player to get thirteen brains wins the round.

Technically, it's just Cthulhu Die, because there is only one 12-sided die, but that sounds a little funny. (You can also get extra dice.) This game went crazy-fast.
For about $5 plus shipping, this was a great buy. The game comes with the custom die, instructions and a handful of sanity tokens* (flat glass marbles). It went way too fast with just two people -- you would need at least three for it to be a challenge -- but it's meant to be a fast game.
Your goal in this game is to stay sane. Depending on the results of the roll, you can take a token from your target, take one from the center (if there are any) or force one or all players to put a token in the center. After you run out of tokens, you've gone mad, but you can still finish another round and hope for a chance to steal a sanity token from Cthulhu and stay in the game. The winner is the last sane player (the only one with at least one token left).
*The mat pictured here does not come with the game. It's a one-of-a-kind piece, put together by my hubby, because we're geeks that way. He printed it onto the same Printable Fabric from Avery that I used for the skull pillow, and I ironed it onto the back of the shaded green fabric pictured above. I think I have just enough fabric left to make a small bag for the die and sanity tokens.
Subscribe to:
Posts (Atom)
