Friday, July 30, 2010

Make: Gravestone Rubbing

Another tutorial re-boot from www.myhalloweenlinks.com, although it's more of a recap of my experience and a guide to other resources than an actual how-to..

This was something my grandmother did when I was a kid. It's been close to 30 years since I've tried it. A few years ago, I ordered a stone-rubbing kit, but didn't do anything with it except lose one of the pieces. I also ordered the video linked below. On an overcast Sunday, in late April '06, I took the "boughten" kit and the other items I'd assembled, and headed to a local cemetery.

It was a real learning experience. First off, it's quite physical work. And time-consuming, if you do it right. Two major things to take with you, in addition to the materials needed for rubbing: sunscreen and drinking water. I remembered the first, and attempted to get the second, but the store had NONE in stock. Not even in the machines outside (truly bizarre). I figured I wouldn't be that long so it wouldn't matter, but I was mistaken! Even on a cool, overcast day, I got a little dehydrated.

The most important thing to remember is to do no harm to the stones! Check out some of the resources below for tips about how to clean them (plain water only), etc.. Common sense plays a part too -- don't touch stones that are leaning, crumbling, or have been patched together (right). Take a camera too, and just photograph any stones that might be jeopardized by rubbing. Note: Please be aware that some states have outlawed the taking of rubbings.

Resources
  • Association for Gravestone Studies
  • Morbid Outlook: How to do gravestone rubbings
  • Cryptic Clues in the Bone Yard. I have this video in my collection, and found it to be quite interesting. It shows you how to build a complete kit without spending a ton of money. The benefit to the video over a website is that you can watch someone do a rubbing.
  • Cyndi's List - a list of cemeteries & funeral homes. Intended for genealogists who want to find a particular grave; however, there may be resources that will help you find a good cemetery to visit.
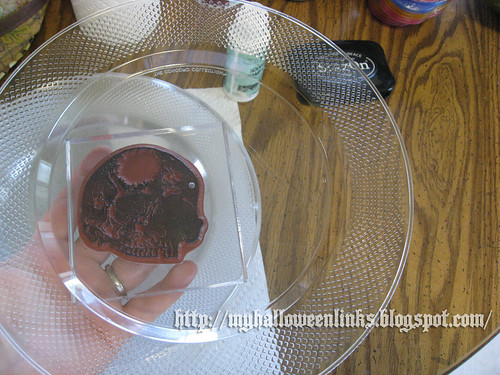
  • There are stone-rubbing kits available. The one I purchased had 5 sheets of special paper, 2 cakes of very hard rubbing wax, a roll of low-tack masking tape and a soft bristle brush.
Prepare for an adventure!
First, pack your bag. A great comprehensive list is available in the resources. My first trip included the items pictured below. Make sure to wear clothes you don't mind getting dirty, and take a big bottle of water!


This rubbing wax came with the kit I purchased, but you can make your own by melting down crayons (see resources) or peeling the paper off a giant toddler crayon. This commercial wax is very hard. I'd like to experiment with different types.
After selecting the stone, very carefully clean it, using a soft, soft brush and plain, clean water ONLY. Make a note (or photograph) of details like cemetery name, name on stone, date, etc.
Cover the stone with your paper. This is special paper that came with the kit. When it's gone, I'll use pellon (interfacing) from the fabric store. Use low-tack masking tape and wrap the paper around the edges and tape on the back. Make sure the paper extends past any place you want to rub - don't risk getting any wax on the stone.

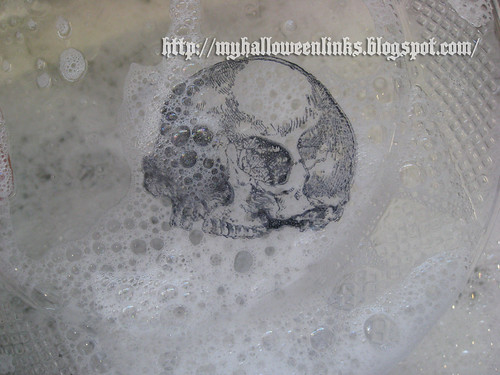
Originally, this cemetery was very, very Baptist. Even if the sign didn't explain it, you could tell by the fact that on the vast majority of the older stones, the women didn't have last names. They were "Jane, wife of John Smith," never "Jane Smith." That's why I picked these two to work on for my first try. It helped that Reed (Abigail's stone, shown up top) is a family name, and she died near Halloween. But essentially, I selected two stones that were in good shape that denied the women their own last names.
   
Start rubbing (see resources for tips). The image will start to appear.

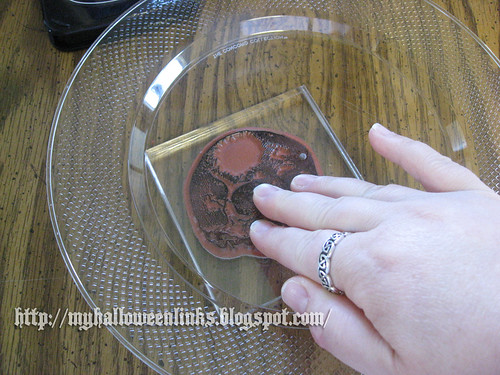
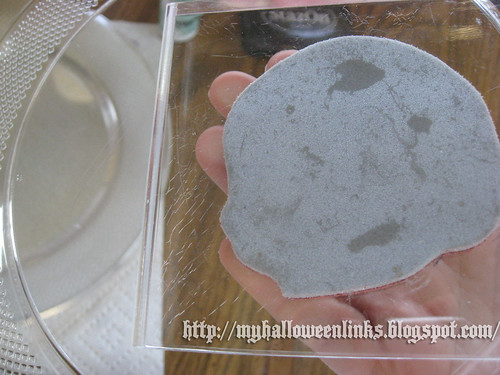
Keep rubbing, until the image is clear and as dark as you'd like it. Carefully remove the tape and roll up the rubbing. See resources for care & handling of the rubbing after you get it home.
On the second example (Elizabeth's), the stone had some extra detail that made it difficult to fit the paper tightly around the sides. It still worked, but it was touchy.

These aren't perfect - not by a long shot - but I'm happy with my first attempts. Sadly, they didn't make it to the new house for some reason, so another trip is in order.

Wednesday, July 28, 2010

Show and Tell: Candle Holder

I just love this candle holder/lamp. It was given to me quite some time ago, by someone who wanted me to sell a bunch of stuff on eBay for her. She didn't want the money, so mostly I think she wanted help cleaning out her basement. This was so heavy (see the marble base?) that shipping would have been prohibitive; instead, I kept it and always have it out, somewhere. (At the moment it's next to the tub in the master bath.)

The glass insert has seen better days, and I'm on the lookout for a replacement. 

Monday, July 26, 2010

Make: Bubble Favors

Another tutorial re-boot from www.myhalloweenlinks.com.

I used these (with different labels) for prizes when I led training classes at the corporate level. I called them "stress bubbles," but you can call them whatever you want. You can give them to trick-or-treaters, or use them as party favors - alone or in a bag of goodies.

Gather Materials
  • "Wedding Favor" bubbles. Avoid the fancy packaged ones at craft stores and look for packs at $1 stores or big box stores (I just bought a 9-pack for $1). You shouldn't have to pay more than 25¢ each.
  • Tape. Try to match the height of the label, plus a little bit if possible (alternately, make the label a little shorter than the tape). If you use a laser printer, the width of the tape isn't as crucial, but if you use an inkjet printer, you'll want to cover all of the print; otherwise, the ink will run when the bubble liquid spills (inevitable). If you can get 1" wide clear tape, this is perfect. In a pinch, you can layer regular transparent tape, but you may need to trim a bit.
  • Labels. Print several images on plain paper and cut out. You can download mine (click image below to open PDF) or make them yourself. You can fit several onto 1 sheet. The labels should be just under 1" high and about 3.5" long. You can do black text & graphics on colored paper, or full color graphics on white paper, etc. Other ideas: Put each persons' name on a bottle. Use a plain mailing label, and handwrite the message or add a sticker scene.
  • Stickers &/or ribbon. If desired.

Assemble
  1. Design your labels, following the specifications above & print onto plain paper. Print & cut out. Add stickers, if desired.
  2. Wrap the labels around the center of the bottle and tape or glue in place. If it's possible that the ink will run, apply tape across the whole label.
  3. Add ribbon around the neck, if desired.
  4. Share!

Label sample (not to scale) - Click to open PDF (right-click to save to your computer):
Note: I made this so long ago, I have no idea what my sources are. Sorry!

Saturday, July 24, 2010

Party Planning: Invitations

Following up a "save the date" mailing, which serves as bit of a teaser and lets people know there is more to come, the invitation gives the needed details (what, when, where, etc.). More information is always available via phone or email.

The first thing you might notice is that the colors are not what you'd expect for a party of this nature. Well, it is an off-season party! I like the incongruity of the summery colors with the skull and spooky font. One thing I'm trying to do is to use some of the things I've been collecting for all these years. I bought these fun invitations not too long ago because the main card color is pretty close to my signature color. This style of invitation is great because you can run the top card through your printer, then attach it to the base card with foam mounting tape.

I had initially planned on stamping the invitation like the envelopes, using the smaller stamp. But I realized a couple of things: 1) the skull was facing the wrong way (for my preference), and 2) I hate trying to line up the stamped image (or, if stamping first, trying to make the text line up properly). My solution: stamp the skull on white paper and scan it, then clean up the image, color it any way I wanted, and lay out the invitation and print (I used Adobe InDesign). This way I could flip the skull so it was facing the way I wanted it for the top of the page.

I've been learning to pare down what is included on the invitation. (I'm not all the way there yet, but it's better than our first party invitation!) This is not a costume party, so I wanted people to be aware (people can feel awkward if they show up to a non-costume party in costume). I also don't want there to be any questions about whether or not guests should feel free to bring hand-crafts like knitting or crochet (always fine at this house). Everyone already knows we have cats, so that info. isn't necessary any more. If we were doing a adults-only party, or were requiring costumes, that information would be important to include.

Stamps: Skull, from StampFrancisco: Large and Small
Ink: Vivid! Dye Inkpad, in Garnet (envelope only; invitation image was recolored digitally)
Font: Black Castle, from dafont.com

Text
Join us if you dare!
For a slightly spooky, not at all sinister, mid-summer “Hallowe’en” bash.
(It’s not really Hallowe’en, but that doesn’t mean much around this place.)

Why:
When:
Where:
Wear: Regular casual (although people have been known to show up in PJ pants & bunny slippers, and that is fine).

What-not: It’s not an over-the-hill party, just a regular birthday party where the theme happens to be Halloween (the birthday ghoul’s favorite holiday and year ‘round obsession).
Food, games, movies and conversation are planned. Knitting/crochet are always welcome. Feel free to get in touch with any questions!

RSVP
by
(email)

Inserts
By the time this post is visible, everyone on the guest should have received their invite, so it's safe to share the item to the right. We always show a movie or two during the course of an evening, and this time have a special surprise for our guests (more on that later). We thought it would be fun if people had a little souvenir (if they like that kind of thing), and worked up this little ticket. I don't know if you can tell, but they're actually perforated. I based the design on vintage movie tickets (like these) and used Photoshop, InDesign, card stock, a sewing machine, paper cutter and hole punch to achieve the look. (If there is interest, I could work up a tutorial.)

Fonts: Jefferson (Liberty Hall), Harting (Admit One) & Kenyan Coffee (everything else)

Not shown: an insert with additional info. We have a large yard, so people can camp overnight if they'd rather not drive home and wanted everyone to know.

Friday, July 23, 2010

Show and Tell: Witch Hat

Eventually, I'm going to run out of stuff at my house to post about and will have to start searching the web for things to share. But it's summer and hey, I've got stuff of my own to show off. Every once in a while, I plan to post an image (with details if available) - evidence of how Halloween is always around, somewhere, in my house.

It makes me a little sad that I can't wear this more often. Truth is, it's a little snug on my big 'ole noggin. And there is really no call for a suede witch's hat most of the time. So this darling bonnet resides atop an old clock in our library (brought down for pictures).

Hat source: Broom Rider from Blonde Swan.
My new hat - decoratedI've had this for a few years; here's a picture of me wearing it several summers ago. My best friend got the black one, and I didn't want to look too much like a copycat, so I went with this one. I added the ribbon band because the unrelenting beige wasn't really to my taste.

That little bouquet of vintage buttons (and spool) that I made is around somewhere...

Thursday, July 22, 2010

Theme: Zombies

From time-to-time, I'm going to put together a collection of links on a topic and share them here. This time: zombies! There are different kinds of zombies. I will always mean the non-Voodoo version; think of Night of the Living Dead: slow-moving; dumb but deadly. Any George Romero zombie. I'm including a sprinkling of Return of the Living Dead, just because of the "Braaaaaains!" thing. By no means should this be considered an exhaustive list; I could go on & on...

Misc. Zombie Fun
Movies
just a sampling; it's not possible to list them all, and everyone has their favorites

  • Shaun of the Dead is a very dark comedy using entirely Romero-style zombies. I'm listing it first because it's fun. Gory, yes. But funny at the same time.
  • Night of the Living Dead (NotLD) is the classic, black-and-white cult film that really kicked off the horror zombie genre. There were movies in this series: NotLD, Dawn of the Dead, Day of the Dead and Land of the Dead. Note: I cannot, even a little bit, recommend the remakes of Dawn or Day of the Dead. The latter was so bad that it didn't resemble the original at all. Both had the wrong kind of zombies. Stick with the classics!
  • In 2007, Romero began a new series, which (so far) includes: Diary of the Dead and Survival of the Dead. He has plans for more, each picking up a character (or characters) where Diary left off.
  • The Evil DeadEvil Dead II (really, a remake of the first movie) • Army of Darkness
  • Dead Alive (incredibly gross, but funny)
  • Zombieland
  • The Return of the Living Dead - campy as all get-out, this is the source of the "braaaaains" line that is inevitably uttered when discussing zombies. (Although everyone knows zombies will go for any flesh.) There are several movies in this series.
  • Sort-of zombie movies that I like: 28 Days Later and Night of the Comet (apocalyptic-type movies, people acting kind of like zombies, but not rising from the dead)
  • Resident Evil Trilogy 1-3 (bears virtually no resemblance the games)
  • I asked my husband if he'd add anything to this list, and he suggested some of Lucio Fulci's movies: Zombie & Zombi 2.
Books
Games
  • Zombies!!! Believe it or not, my husband and I bought this game, and played it, on our honeymoon. As a game, it's probably better with at least 3 people. There are a ton of expansion packs for the game, but start with just the main box to see if you like it. If the game doesn't' come with it, go ahead and order a bag of zombies. You can use them as cupcake toppers as well.
  • Zombie Dice (just reviewed recently)
Treats
  • Try these strawberry jam-filled candies (Skull Crushers), or use a brain mold instead.
  • Straightforward & simple: cupcakes with zombies from the BagOZombies (wash first) on top.
PS: The "knitting zombie" is yours truly. I was a zombie in a student film that was never finished. I was first in make-up, but in the last scene filmed, so...I stood around like this, knitting. It's too bad the film didn't get finished, but I've gotten plenty of mileage out of the knitting zombie pics, so it's all good.

Tuesday, July 20, 2010

Make: Necronomicon Mini-book Invitation

I have a few small tutorials that have been housed on MyHalloweenLinks, but I'm going to transition them to here, because they need to be updated. The first is a "hack" of an existing mini-book created by Ray O'Bannen (linked below). These directions will show you how to add text to his image, so you can use this little booklet as an invitation and more.

You have six small pages to enter your details. You will need some minor layout experience, MS Word experience (or any page layout program -- I initially wrote the directions for Word, so I'm continuing) and access to a color printer. The file used to be in Word, but is now in PDF format, which might make this a little more difficult.

Disclaimer: Ray O'Bannen designed the faboo mini-book; I'm just applying my idea to his existing art. Neither he nor his site have anything to do with this one.
Directions
  1. Download the PDF for Book 3 on the Haunted Paper Toys' Necronomicon Notebooks page (Books 1 & 2 are cool, but have illustrations - I haven't tried this method with them, but it could work!). 
  2. Get the image into Word. There are several ways to do this, and I can't go into them all. I was able to select the image on the PDF and copy it, then paste it into a Word document.
  3. Add text boxes over the "parchment" pages, following the guide (right). 
  4. Set the layout to "in front of text" if it didn't happen automatically (otherwise, you can't move the box around).
  5. After you create the text box, use the formatting options to adjust the text direction to match the first image, then go to Format/Text Box to turn off the border and fill.
  6. Print. (How it looks will depend on the font you use and the quality of your printer.)
  7. Follow the directions (first link on the Notebooks page) to assemble, then pop in an envelope and mail
Please note: the original file is high-resolution for excellent printing. You may have system resource issues, depending on your computer's memory.

    Monday, July 19, 2010

    Games: Alan Wake

    This is a quick drive-by posting. I don't think I qualify as a gamer, per se, because my interests and skills are very limited. I tried Ghostbusters 3 (PC) and couldn't do it. I managed Dragon Age: Origins (PC) and World of Warcraft okay, but couldn't hack the controls for the newest Resident Evil (console). (I have hand/eye coordination issues and first-person shooters trigger massive dizzy spells. (I'm still sad I couldn't play Portal.)) I got pretty good at Viva Piñata...I SO fail at being a gamer.)

    I don't think I can play Alan Wake, either (haven't tried the controls yet). But whoa, is it cool! It's actually a game I'll sit down and watch someone else play. It's reminiscent of Twin Peaks (which I loved), and I'd have a hard time believing it's not intentional. There's a bit of Steven King thrown in as well (he's actually quoted at the beginning).

    We got through episode 1 yesterday (there are 7 currently, with more promised as future downloadable content) and I was kind of sad that I was so drowsy I couldn't keep watching. (I've watched bits and pieces of games while others played, but never more than a couple of minutes.)

    Alan Wake is a best-selling writer who has hit a slump and travels with his wife, Alice, to Bright Falls, WA for a change of scenery. He's not there long before things turn truly bizarre and pretty freaking scary.

    Sunday, July 18, 2010

    Games: Zombie Dice & Cthulhu Dice

    We stopped in a comic shop recently (because I needed sleeves for my Buckaroo Banzai comics - the originals sleeves were a little dingy and I want those comics to stay pristine) and spent some time looking through the game section.

    We didn't buy anything else that day, because the prices seemed a tad high, but after we got home, my husband looked up one of the games online and found that they were available for a much better price directly through the company (Zombie Dice, at the comic store: $24.99; direct from Steve Jackson games: $13.13, plus shipping). I'm all for buying locally, when it's sane. The local shop's price, however, was not sane.

    What we got, for around $20: Zombie Dice and Cthulhu Dice, directly from Steve Jackson Games. Pictured above is the die from the Cthulhu set (more on that in a bit). Both games are fun, fairly quick to play, and very portable.

    Zombie Dice
    With just two people playing, this game went pretty quickly; like all games of this type, it's certainly more fun with three or more players.

    In this game, you're the zombie. Each die represents a potential human victim, color-coded to indicate the strength of your opponent. (The green dice have more brains, the red have more shotgun blasts.) You roll three dice at a time, hoping for brains (obviously, since you're a zombie). Setting aside the brains and the shotgun blasts (feet = escape), you keep rolling three at a time until you have three shotgun blasts, then tally up how many brains you got. The first player to get thirteen brains wins the round.

    Cthulhu Dice
    Technically, it's just Cthulhu Die, because there is only one 12-sided die, but that sounds a little funny. (You can also get extra dice.) This game went crazy-fast.

    For about $5 plus shipping, this was a great buy. The game comes with the custom die, instructions and a handful of sanity tokens* (flat glass marbles). It went way too fast with just two people -- you would need at least three for it to be a challenge -- but it's meant to be a fast game.

    Your goal in this game is to stay sane. Depending on the results of the roll, you can take a token from your target, take one from the center (if there are any) or force one or all players to put a token in the center. After you run out of tokens, you've gone mad, but you can still finish another round and hope for a chance to steal a sanity token from Cthulhu and stay in the game. The winner is the last sane player (the only one with at least one token left).

    *The mat pictured here does not come with the game. It's a one-of-a-kind piece, put together by my hubby, because we're geeks that way. He printed it onto the same Printable Fabric from Avery that I used for the skull pillow, and I ironed it onto the back of the shaded green fabric pictured above. I think I have just enough fabric left to make a small bag for the die and sanity tokens.

    Saturday, July 17, 2010

    Decorate: Raven Pillow

    Another new pillow for the library. Like the skull pillow, this one is also an appliqué, but is more of the standard style: a shape cut out and ironed-on and sewn in place.

    Just a simple picture of the appliqué in progress. I had barely enough of the gray-swirls-on-black fabric! I actually had to patch a couple of bits together to make it work (hardly visible), but it was the best choice from the stash and, as usual, I wanted to work on it now. I used heavy-duty two-sided interfacing and, with a dry, hot iron, applied it to the back of the fabric.

    After I cut out the raven outline*, I decided which direction I wanted it to face, stuck it down and traced. (Probably obvious, but it will face the opposite direction once it's applied.)

    The case fabric turned out to be a little resistant to the iron-on, so I had to sew all the way around the raven with a tiny zigzag stitch. (I did this before I finished sewing up the sides of the case, which is a sham-style, with a flat overlapped opening on the back.) Speaking of the cases themselves: I haven't shown the steps I follow to make them. If there is an interest, I can write up a tutorial the next time I make a pillow.

    There is no real theme to the fabrics, in case you're wondering, unless "I had it in my stash" is a theme. (My current goal is to try and use what I already have for as many projects as possible. Buying fabric out here is a major pain as well.) I'm for all the fabrics used in the library to have a touch of gold somewhere in the pattern, but that's pretty much the extent of it.

    *New uses for old things
    Surprise! The raven image is actually a pumpkin-carving pattern I downloaded about four years ago. So glad I did, because I don't think it's on the Pumpkin Lady site anymore.(I have a warning on My Halloween Links site, reminding people to download/save/print things of interest, because there is no guarantee they'll be available later. I'm very glad I took my own advice!) Any pattern that doesn't have a lot of detail would probably work. Now I want to do a spooky tree. That shouldn't be too tough to work out!

    Thursday, July 15, 2010

    Decorate: Deck the Walls part 1

    I'm no great shakes as a decorator, but I do have this vision of a gallery of sorts; a wall of portraits and photos that, near Halloween, are randomly replaced with framed images that fit the theme. This is, in part, because I'm a lazy decorator. One set of nails/hooks is way better.

    The wall
    In our house, the gallery will be on a red wall. A wall painted in a vivid color has always been something I wanted to do, but I've been intimidated to take that step. Lucky for me, the previous owner of the house was less timid and painted the main wall of the room we now call the library a perfect red. While not all of the rooms in this house were painted to my taste, we did luck out with two: the library, with it's broad, red wall; and the guest bathroom, which is quite orange. Eventually everything else will be repainted, but not those two.

    The gallery
    Some of the following I already own, some of it has been wished for, and some others are just links I'd like to share.

    The pictures with the green wall were from our first Halloween party, several years ago. "Aunt Sarah" and "Constance" are lenticular prints. You've probably seen similar images on DVD covers and in-store displays. When the technology is applied to portraits, and hung on a wall or framed on a table or shelf, they become something else altogether.

    You don't want to fill a wall with these -- just one or two, nestled in with some real portraits (you don't have to know the people - more on that later). It doesn't even have to be expensive. We've purchased 5x7" prints for under $10 locally, and they can be purchased online for as little as $14.95, including shipping (depending on the company).

    Imagine that you walk by the portrait of Sarah here (left), and a bit of movement catches your eye. You look again, and it's not the same portrait anymore.

    "Aunt Sarah" was the my first big Halloween décor purchase. I bought a gaudy frame (well, really, an ugly framed print with a sturdy, gaudy frame (less expensive that way)) and hung her in my dining room. I surrounded her with some old family portraits and some creepy looking ones of my husband and I that he Photoshopped. She startled our guests... and then I left her hanging on the wall for 3 years. She was that cool.
    This is Constance. I won an 8x10 version of her a couple of years ago from Haunted Portraits, and she looked fabulous in our gallery last year! (I took pictures, but they didn't turn out. Will definitely make sure to get some good ones this year.)

    One item on my long-running ("splurgie") wish list is one of his Ghost Portraits.
    I don't own anything from Lewis Barrett Lehrman's Haunted Studio, but one of his prints has been on my wish list for quite some time. (I like many of them!)

    If you have the cash, Lehrman will create a print of your house, haunted. How fun would that be? Personally, I don't like the shape of my house (on the outside), so I'd be content with one of the existing prints. But if I had a differently-shaped house (and the $), I'd be all over this option!

    Your own gallery
    You can nestle one or two "zingers" in among your regular family photos, or you can keep going with the theme and frame regular (color, black & white or sepia) photos (of your family, or ones you buy at an antique store). More options:
    • Dig through family photo albums for old portraits or pictures of yourself or other family members in Halloween costumes, copy/enlarge and frame.
    • Remember how I said the pictures didn't have to be of anyone you know? Download these free scans I've uploaded: Boy and Girl, then print & frame. (Not spooky, just old.) I don't know who they are, either. They were a gift from someone that knew I was looking for portraits like this.
    • Hit up antique and thrift stores for old portraits. Bonus if you can find one already framed. I'm still kicking myself for not buying one we found that had human hair (probably the subject's) added to a portrait.
    • If you have some Photoshop skills, take an ordinary photo and add some "orbs" or ghost-like shapes. Like these:
      • Example of a fake orb
      • OogieBoogie (This one features some of my husband's brilliant Photoshopping skills. The ghost (hub, in a sheet) image was taken at one location, the headstones at another, the landscape at yet another, etc.) Prints available for sale; please contact me if interested.
    One thing I'd like to do is get all the frames to be in the same color family. I'm leaning toward a dark, antique gold.

    Finally, for the end of part 1, you might want to check out Uppercase Living* (Fall 2009 catalog, p. 138 ff) for more permanent applications. The vinyl rub-ons can also be applied to sign boards, etc., and stored (I have a small one (a gift) that I'll be adding to the glass of a framed piece of fabric or paper). I've had my eye on the wall-sized tree myself, but would be nervous about screwing it up! They seem to sell via reps and home parties only, and their online catalog isn't search-able (and it makes a sound every time you turn a page (ew)), so it may not be worth the hassle.

    *I'm a little hesitant about sharing this because, while the company doesn't appear to be opposed to selling Halloween items, the one representative I encountered announced that she was skipping those pages because she hated Halloween and didn't understand why anyone would want to decorate for it. Turned me right off. Saved me some money, though.

    Tuesday, July 13, 2010

    Favors: Music Mix part 1

    I'm currently working on three, count 'em, three Halloween music mix CDs this year. Why three? Well, I've been collecting Halloween music for years, planning on putting together a fun mix to share with friends. Years come and go, but I still haven't made that mix. Well, this year, I'm doing it. For real.

    The problem,  if you can call it that, is that I have 50+ Halloween albums (not counting spoken-word collections), with several hundred songs to choose from (several albums are collections with duplicates) plus a ton of older singles, the oldest of which was recorded in 1912 (spooky-themed, not necessarily Halloween-specific). I need to pick 13-15 songs for the main mix (the second mix is a surprise so I can't talk about it yet). It's not necessarily an embarrassment of riches, because some of the music is really bad. But there are some really great pieces that are calling to be included and I'm having a hard time narrowing it down. Plus there is the concern that there is better music out there that I've missed. Some day soon, I'm going to force myself to just stop and make the thing; there's always next year!

    In the works:
    • Actual party mix (to play at the party) - easiest, because there is no limit on the number. I can just pick the songs that I like and that I think are appropriate and have the playlist ready to go on my MP3 player.
    • Friends' mix (to give to guests and other friends) - less easy, as already discussed. (The package and playlist will be in part 2, which I'll post sometime in August after the party.)
    • Surprise CD
    • Kids' CD (right) - a mini disk of "traditional" Halloween tunes that are kid-friendly that won't necessarily be on the friends' mix (e.g. Monster Mash).
    The labels for the kids' mix may not work. I used full-sheet ink-jet sticker labels; they're pretty porous and will show fingerprints too well. I may try to laminate using packing tape... was SO hoping to avoid cutting out those circles by hand! (I used a 2½" circle punch for the outer circle and a 1" punch for the inner circle.)

    If I hit ten followers in the sidebar by the time the mixes are finished, I'll put up at least one of the mixes as a prize for a commenter. I'll announce that with the "reveal" post.

    Skeleton clip art sourceFont

    Sunday, July 11, 2010

    Decorate: Skull Appliqué Pillows

    I mentioned in a previous post that I had plans to make another one of these. Later the same day, I did just that and now this pillow is living in our library. (Boy, does that love seat need a new cover!) I love the skull appliquéd onto a fancy material. This would also look great on less shiny home decorating fabric.

    Once I got the pillow-making bug, I went digging in my fabric stash and discovered that I had some of the original fabric left. I also found a small, never-used decorative pillow that I'd tossed into a closet.

    That only left the appliqué to arrange. I used the large skull stamp from Stamp Francisco and black ink to stamp the image on high-resolution (very smooth) paper, then scanned it at a high resolution.

    I then enlarged the image and printed it (along with some friends) onto Printable Fabric from Avery. The reason I like this fabric is because it's thick and sturdy, with an iron-on backing which helps keep the appliqué in place until I can sew around it. (Next time, I'll be sure to trim closer to the image!)

    The appliqué is washable, to a point. For some of the printable fabrics, the recommendation is that no detergent be used and that the item be rinsed in warm water.

    I have other printable fabrics that I want to try; a raven pillow is planned as well.

    Saturday, July 10, 2010

    Movies: I Sell the Dead & Trick 'r Treat

    The thing is, I live in the country, close to an hour's drive from any decent movie theater. So I don't go to the movies very often and I've pretty much stopped paying attention to what's playing. I keep my ears and eyes peeled for mention of movies that sound interesting; renting is also a pain, so we end up buying movies - hopefully on sale - and hope for the best. Every once in a while, I'm going to sort-of review a couple of movies from our massive collection; new or old, doesn't matter. This time, it's one new (to me) and one a little older.

    I Sell the Dead
    I'm starting to write this post before the movie is even here. I heard about it last week and ordered it over the weekend. With a cast that includes Dominic Monaghan (LoTR), Ron Perlman (Hellboy (♥), etc., etc.) & Angus Scrimm (Phantasm series), how could I resist?! I was going to order it eventually, but when I saw that Scrimm was in it, I had no choice. Every time we watch a Phantasm movie, my husband comments that it's too bad Scrimm doesn't work more. He seems like a very cool gentleman (from the DVD extras) and I'd love to have him over for dinner or something. I'll have to settle for buying his movies.

    Okay, the movie arrived and we watched it. Monaghan plays a "Resurrection Man" (a grave robber from around the turn of the 20th century), but in this case, Resurrection Man has a whole new meaning, and that's all I'm going to say. Not brilliant, but fun. (I didn't check my watch the entire time, which is a good sign.)

    Trick 'r Treat
    I waited for this movie for a long time, and it did not disappoint. Truth is, I don't know if it ever made it to theaters, and I'd kind of given up on it and didn't realize it had been available on DVD/Blu-Ray for a few months before I found out (and ordered). But the second I heard it was available, I ordered a copy.

    It's a pretty intense flick, and it earned its R rating. (There's some gore, but mostly...it's intense.) It's a story set on Halloween, naturally, told out of order, so you see different parts of the night from the different characters' perspectives. Eventually, they all come together. Some of the stories reminded me of the old scary comics I used to buy back in the mid-70s, the kind with the half torn cover that I got for a dime from the restaurant/candy store in my dad's hometown. Then I'd read them and have to have an escort to the bathroom because every sound and shadow made me jump.

    There is one scene (no spoilers here) with dozens & dozens of jack-o-lanterns that would make any Halloween geek just swoon.

    Friday, July 9, 2010

    Straight to Hell

    On Sunday, I mentioned that it might be time for our annual road trip to Hell (Michigan). The more I thought of it, the better the idea seemed, and I proposed a drive that very afternoon. Here are some of the pictures. Scroll to the bottom to see the spooky souvenirs we picked up.

    The top picture on the page is near the entrance to "Screams," where you can get a seriously yummy ice cream cone or sundae and shop for souvenirs & spooky decor most of the year. If you're a smashed-penny collector, there is a machine inside with four different selections.

    There isn't a lot to do in Hell, although the more outdoorsy and active you are, the more opportunities there are. Not pictured: miniature golf (I forgot sunscreen, so that was a no-go). There is also canoeing nearby, but it's not my thing. Check out the events calendar before you go; this was the first time in many years that there wasn't some event taking place during our visit. (Last year it was a hearse collector's meet-up.)

    You can get married in Hell, or renew your vows.

    A peek inside the tiny chapel.

    After the ceremony (or just whenever (like we did)), pose for a special wedding picture!
    A little wandering brought us to this circle of concrete "Tikis."
    There is a very pretty river running next to Screams, with a viewing post and a long bench. At least we thought it was pretty until the wind shifted... so, your mileage may vary.
    Finally... the souvenirs! We try to buy something for the house every year. This year, the selection was smaller overall, but it was the first time we'd seen any of the Haunted Memories portraits available in a retail store. (We have a large Aunt Sarah from Haunted Memories, plus a Constance from Haunted Portraits, and the collection needs some representatives from the male gender.)

    We snapped up Uncle Bernie (flaming skeleton) & Uncle Percy (zombie). Now I just need to find frames!
    This is a good road trip for us because it isn't too far away, but it's still good to have other places in mind to stop if you're making any kind of drive. There is a small village, Dexter, quite nearby, and my understanding is that it's not terribly far from Howell, which boasts an outlet mall. We stopped at a lovely little roadside farm market and bought yummy black bean salsa, unsalted tortilla chips and sweet-hot pickles to enjoy with our supper.

    Wednesday, July 7, 2010

    Make: Party Plates

    stamped-plates-how-to6You'll be seeing this skull image quite a lot in the weeks to come. I had to order replacements because the first pair was lost in the move, so I'm determined to make them earn their keep. (I think I'll add a tag for every entry using the images.) On Sunday, I tried out a theory, stamping the back of some clear plastic plates. It ended up being a little tedious, but I like the effect, so I'm going to do up a bunch for my birthday party. Following are the steps I followed:

    stamped-plates-how-to1First, gather your materials:

    Clear plastic plates (available at local grocery & food service stores). These are essential, because there is no food-safe ink that I'm aware of, so we must stamp on the reverse side. (The images will be flipped.)

    Rubber stamp(s). Phrase stamps won't work because of the way we're stamping, but most image stamps should work fine. I'm using two skulls from StampFrancisco: Large and Small. I ordered the "cling cushion" version because I already had some acrylic blocks. They also come mounted on wood blocks (and unmounted).

    Solvent ink. I used JetBlack StazOn ink from Tsukineko. This is a great ink, but it's a little smelly, so make sure you use it in a well-ventilated area. It's also pretty permanent once it dries, so this is probably not a project for the little ones. (It stamps great on shrink plastic & CDs, too.) Read any warnings on the packaging and follow. Don't work anywhere near light-colored fabrics.

    Solvent ink cleaner. I have no idea where I got mine; I've had it for years. The same company that makes the StazOn ink also makes a cleaner: Tsukineko StazOn All-Purpose Cleaner.

    Paper towels

    stamped-plates-how-to2Don't bother washing the plates before you start. You're going to be touching the surface with your hands a lot and may have some cleaner on the reverse side, so washing afterward is crucial.

    Ink your stamp.


    stamped-plates-how-to3These steps are a little tricky to convey when one is doing one's own photography. Depending on your stamp size and the detailing, you may be able to stamp the plate on a table or counter. This stamp needed some extra attention, so I held the stamp in my hand, inked side up, and placed the back-side of the plate down onto the inked surface.

    We are always stamping the BACK of the plates.

    stamped-plates-how-to4Then, I carefully pressed the plate down onto the inked stamp. (Needed one hand to take the picture! The stamp and plate were held in one hand, while I pressed down with the other.)

    Work quickly: this ink dries fast!

    Take care not to bounce or twist the stamp.

    stamped-plates-how-to5If necessary, flip the plate over and press the stamp down.

    Carefully pull the stamp away from the plate. The ink will be completely dry and pretty permanent within a minute or two.

    If the image isn't clear, quickly use the solvent cleaner to remove the image and try again. The plates I did took a couple attempts each. (When you're all done, use the cleaner to clean the stamp.)


    stamped-plates-how-to7Finally, gently wash the plates in warm, soapy water and rinse.

    Bonus: They're reusable! (Probably hand-wash only.)
    Disclaimer: Use of tutorials or other information on this blog is done at your own discretion and risk. Please use common sense and good safety practices. I accept no responsibility for other peoples' application of my entries.
    Related Posts with Thumbnails